Battlefield Atlas
War of 1812 · 1814 Locked

Lundy's Lane, 25 July 1814

On the evening of 25 July 1814, a mile from the Falls of Niagara, Major General Jacob Brown's U.S. Left Division ran into Lieutenant General Gordon Drummond's British, Canadian and Indigenous force holding a low hill on Lundy's Lane. Winfield Scott's brigade blundered into the British guns at dusk and was cut up in the open; Thomas Jesup's 25th Infantry turned the British left and captured Major General Phineas Riall; after dark James Miller's 21st Infantry ('I'll try, sir') took the guns on the hill with a volley and a bayonet charge. Drummond's three night counterattacks failed to recover them, but at midnight the battered Americans, their generals wounded, withdrew to Chippawa and left the guns behind. With more than 800 losses on each side, it was one of the bloodiest battles of the War of 1812 and the bloodiest fought in Canada. Tactically a draw, it ended the American advance into Upper Canada.

Open the interactive map8 stages on modern satellite imagery and terrain, with 3D elevation

This battle opens with Battlefield Explorer ($4.99 a month or $39 a year), which unlocks every battle in the atlas and every one added later. Lifetime access and war packs are one-time options. Free battles include Thermopylae, Actium, Hattin, Agincourt, Vítkov Hill, Bosworth, Fort William Henry, Yorktown, Waterloo, The Alamo, Antietam, Little Bighorn, Belleau Wood, Omaha Beach, Inchon, Ia Drang, 73 Easting, Wanat, Baghdad Thunder Runs, Battle of Raqqa, Battle of Kyiv, Battle of Hostomel Airport, Siege of Mariupol, Kharkiv counteroffensive, Kherson counteroffensive, Bakhmut, Mala Tokmachka and Robotyne, Avdiivka.

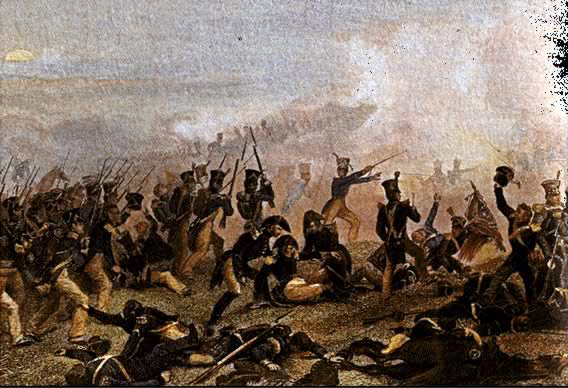
Battle of Lundy's Lane (Chappel)
Battle of Lundy's Lane (Chappel) — Alonzo Chappel — public domain

The battle, stage by stage

  1. 25 July 1814, about 6-7 PM

    The hill at Lundy's Lane

    Three weeks into the American summer offensive into Upper Canada, Major General Jacob Brown's Left Division, which had beaten Major General Phineas Riall at Chippawa on 5 July, has fallen back to the Chippawa River. Riall has pushed light troops and militia forward to Lundy's Lane, a road running inland from the Portage Road along a rise a mile from the Falls of Niagara. Riall had ordered a withdrawal, but Lieutenant General Gordon Drummond, coming up from Fort George with reinforcements, countermands it as Scott approaches and reoccupies the hill. He places his guns, two 24-pounders, two 6-pounders and a 5.5-inch howitzer, among the graves of the little cemetery beside the meeting house at the top of the rise, the 89th Foot behind them, the Incorporated Militia and the light company of the 8th on the left toward the Portage Road, and the Glengarry Light Infantry and John Norton's warriors on the right. About 6 PM Brigadier General Winfield Scott's brigade of about 1,000 to 1,200 regulars, marching north up the Portage Road, nears the British; shortly after 7 PM it comes out of the woods and finds them waiting.

  2. About 7:15 PM

    Scott in the open

    Scott sends to Brown for the rest of the army, but rather than fall back he deploys his brigade, the 9th and 22nd side by side on the left under Colonel Hugh Brady (then Major Henry Leavenworth) and the 11th on the right, with Towson's guns, in the open fields south of the hill and opens the fight shortly after 7 PM. The British guns on the crest, firing across the plain, tear gaps in the blue lines; Colonel James Miller later wrote that the enemy had 'their artillery posted on a height in a very commanding position.' For more than an hour the brigade stands and trades fire at long range and loses heavily. Scott sends Major Thomas Jesup's 25th Infantry off to the right, into the woods east of the Portage Road.

  3. About 8 PM

    Jesup on the Portage Road

    Following a disused track toward the river through the woods, Jesup's 25th comes out on the British left, surprises the light company of the 8th and the Incorporated Militia and drives them back up the Portage Road. Jesup sends Captain Ketchum's light company to the crossroads where Lundy's Lane meets the road; in the gathering dark Riall, wounded in the arm and riding to the rear, blunders into them and is taken prisoner, along with the militia cavalry officer Captain William Hamilton Merritt. Most of the other prisoners slip away. To cover his threatened left, Drummond realigns his infantry behind the lane to meet the threat on his left and withdraws the Glengarries, leaving his guns exposed on the crest.

  4. About 9 PM

    'I'll try, sir'

    Night has fallen when Brown arrives with Brigadier General Eleazer Ripley's brigade of regulars and Brigadier General Peter B. Porter's militia brigade; Scott's shattered regiments, reduced to a few hundred men, are pulled back. Brown sees that nothing can be done while the guns command the field and asks Lieutenant Colonel James Miller of the 21st Infantry whether he can take them. 'I'll try, sir,' Miller is reported to have answered. While the 1st Infantry on his left and the 23rd on his right draw the defenders' attention, Miller leads the 21st up the south-east slope of the hill under cover of darkness.

  5. About 9:15-10 PM

    The guns are taken

    From a few yards away the 21st fires a single volley into the gunners and charges with the bayonet. The gun crews are shot down or driven off, and the Americans take every gun on the hill. The 89th counterattacks and is thrown back by Miller and Ripley. Brown brings up Towson's, Biddle's and Ritchie's guns beside the captured British pieces and forms a line along the crest, Porter on the left, Jesup on the right. Between about 9:30 and 10 PM Colonel Hercules Scott's column, about 1,200 regulars of the 103rd, 8th and 104th with a militia brigade, some 1,500-1,700 men in all, many of whom have marched some 20 miles that day, reaches the field in the dark; by most accounts it stumbles into the American line, loses its three 6-pounders, and falls back; the 6-pounders are retaken. The Royal Scots main body comes up in reserve.

  6. About 10-11:30 PM

    Three counterattacks in the dark

    Drummond, shot through the neck but still in the saddle, now attacks to retake his guns. Three times his line, in a grain field north of the lane and increasingly a mix of detachments rather than whole regiments, advances without skirmishers to close range; three times the musketry duel around the guns and the gravestones ends in hand-to-hand fighting and a British retreat. In the confusion units fire on friends: the Glengarries, going back for ammunition, are taken for Americans and fired on by the 103rd and 104th. Between attacks Winfield Scott leads the survivors of his brigade in a charge of his own at the British center; the 89th, kneeling in the grain, fires into it at about 20 paces; caught by fire from both sides, American fire from Ripley's brigade included, the column breaks, and Scott is badly wounded. Brown is also wounded twice.

  7. 26 July, about midnight-2 AM

    Withdrawal to Chippawa

    By midnight only about 700 Americans are still standing in the line. Brown, out of action, orders the army back to its camp at Chippawa to get water, ammunition and food; Porter and other officers protest but obey, and Ripley, who had held the hill, follows. Short of horses, the Americans leave the captured British guns and some of their own on the hill. A party sent back for a British gun brings off one British piece and leaves two of their own. The exhausted British, Canadians and warriors do not pursue and sleep on or near the field. The column reaches Chippawa in the small hours (by one account about 2 AM).

  8. 26 July 1814, morning

    A bloody draw

    Ordered to go back for the guns, Ripley marches out about 9 AM with some 1,200 to 1,500 men, finds Drummond back on the hill with about 2,200, and turns away unmolested. The Americans then fall back to Fort Erie, burning Bridgewater Mills and breaking down the Chippawa bridge as they go. Each side has lost more than 800 killed, wounded, captured or missing, about 860 American and 880 British and Canadian by the official returns, in about five hours, making it one of the bloodiest battles of the war and the bloodiest fought in Canada. So many dead lie on the field that the British burn many of them on a pyre. Both armies claim victory, but the American advance into Upper Canada is over; Drummond follows Brown to Fort Erie and lays siege to it in August.

Forces

Brown brought about 2,500–2,800 men; Drummond began with about 2,000 on the hill and grew to about 3,500 as reinforcements arrived after dark. Totals are fairly well established from Graves's order of battle; unit figures are his.

British and Canadian forces (Drummond, Riall)

Engaged (all arrivals)The American Battlefield Trust gives 3,500; the City of Niagara Falls marker says about 2,000 at first, later reinforced by more than 1,700; the national plaque gives Drummond 'about 2,800 men'. American Battlefield Trust, 'Lundy's Lane'; Historical Marker Database, 'The British Defense'; Historical Marker Database, 'Battle of Lundy's Lane' (national plaque)about 3,500 (2,800–3,700)
GunsTwo 24-pounders, two 6-pounders and a 5.5-inch howitzer on the hill (with a Congreve rocket section); Hercules Scott's column brought three 6-pounders. Historical Marker Database, 'The British Defense'; Graves's order of battle, collected in Wikipedia, 'Battle of Lundy's Lane' (lead only)5 on the hill, plus 3 with Hercules Scott
On the field next morningThe force Ripley found back on the hill on 26 July (Graves). Graves's figures, collected in Wikipedia, 'Battle of Lundy's Lane' (lead only)about 2,200
Hercules Scott's columnAbout 1,200 regulars of the 103rd, 8th and 104th with a militia brigade (History of War; mywarof1812.com); Graves gives 1,070 for the regular column alone. History of War, 'Battle of Lundy's Lane'; mywarof1812.com, 'Battle of Lundy's Lane'about 1,500–1,700

U.S. Left Division (Brown: Scott, Ripley, Porter)

EngagedThe American Battlefield Trust gives 2,500; Graves's order of battle totals about 2,780 including artillery and cavalry. Scott's first brigade alone numbered about 1,000–1,200. American Battlefield Trust, 'Lundy's Lane'; Graves's order of battle, collected in Wikipedia, 'Battle of Lundy's Lane' (lead only); Wes Turner, 'Battle of Lundy's Lane', The Canadian Encyclopediaabout 2,500–2,800
Still in the line at midnight World History Encyclopedia, 'Battle of Lundy's Lane'about 700

Casualties

About 1,730 men were killed, wounded, captured or missing in six hours, nearly equally divided between the two armies, making Lundy's Lane one of the bloodiest battles of the War of 1812 and the bloodiest fought in Canada. The official returns survive, but the split between captured, missing and dead was revised later. Certainty: good.

British and Canadian forces (Drummond, Riall)

Total casualties (killed, wounded, captured, missing)Drummond's official return gives 878; the American Battlefield Trust uses 878, the Niagara Falls Museums 876, and the Niagara marker series and Parks Canada say 'over 800' on each side. American Battlefield Trust, 'Lundy's Lane'; Niagara Falls Museums, 'The Battle of Lundy's Lane' history notes; Parks Canada, Battle of Lundy's Lane National Historic Site of Canada878 (about 800–878)
KilledOfficial British return, as given by Donald E. Graves (Where Right and Glory Lead!, 1997); Wikipedia used only to locate the figures. Graves's figures, collected in Wikipedia, 'Battle of Lundy's Lane' (lead only)84
WoundedOfficial return; the wounded included Lt. Gen. Drummond (shot in the neck) and Maj. Gen. Riall, wounded in the arm and then captured. Graves's figures, collected in Wikipedia, 'Battle of Lundy's Lane' (lead only); American Battlefield Trust, 'Lundy's Lane'559
Captured and missingGraves revises the original return after matching the missing against American prisoner lists; Riall and Capt. William Hamilton Merritt were among those captured. Graves's figures, collected in Wikipedia, 'Battle of Lundy's Lane' (lead only)235 (42 captured and 193 missing (original return); 169 captured and 55 missing (revised))

U.S. Left Division (Brown: Scott, Ripley, Porter)

Total casualties (killed, wounded, captured, missing)The American return of 30 July gives 860; the American Battlefield Trust 853 and the Niagara Falls Museums 861. American Battlefield Trust, 'Lundy's Lane'; Niagara Falls Museums, 'The Battle of Lundy's Lane' history notesabout 860 (853–861)
KilledThe return of 30 July lists 171 killed; Graves adds three lieutenants later confirmed killed on 25 July. The returns were not collated until five days after the battle. Graves's figures, collected in Wikipedia, 'Battle of Lundy's Lane' (lead only)171–174
WoundedAmong the wounded were Maj. Gen. Jacob Brown (twice) and Brig. Gen. Winfield Scott (badly, in the shoulder). Graves's figures, collected in Wikipedia, 'Battle of Lundy's Lane' (lead only); Wes Turner, 'Battle of Lundy's Lane', The Canadian Encyclopedia572
Missing and capturedGraves's revision of the American return. Graves's figures, collected in Wikipedia, 'Battle of Lundy's Lane' (lead only)107–117 (117 missing (original); 79 captured and 28 missing (revised))

Equipment and ships

GunsThe 21st Infantry captured the British guns on the hill, but the Americans lacked horses to remove them and abandoned them, with some of their own, when they withdrew; Drummond recovered them the next morning. Niagara Falls Museums, Lundy's Lane battlefield tour: 'The British Defense'; Wes Turner, 'Battle of Lundy's Lane', The Canadian EncyclopediaBritish guns taken, then left behind

Then and now: how the ground has changed

The farm fields, orchard and woods of 1814 are almost entirely under the city of Niagara Falls; the hill crest survives as Drummond Hill Cemetery, with a few small preserved parcels nearby, while the roads of the battle, Lundy's Lane and the Portage Road, are still city streets.

The interactive map can show the period landscape (2 shapes: Battlefield built over by the city (approximate extent), Woods south of the hill and east of the Portage Road (1814, conjectural)) under the units. Open the map.

Weapons

British and Canadian forces (Drummond, Riall)

Short Land Pattern musket ("Brown Bess")

Short Land Pattern musket ("Brown Bess")

Smoothbore flintlock musket · 1768–1790s pattern

At Lundy's Lane: Musket of the British regulars and Canadian fencibles; the 89th, kneeling in a grain field, broke Scott's late charge with a volley at about 20 paces.

The British infantryman's musket for most of the 18th century. Accuracy beyond about 100 yards was poor, so the tactics were volleys at close range followed by the bayonet, which the Brown Bess was built to carry.

Caliber
.75 (ball about .69)
Effective range
about 50–100 yd against a formed line
Rate of fire
3 rounds a minute, drilled
Photo: Tower (British Ordnance) · Public domain
Light 6-pounder field gun

Light 6-pounder field gun

Smoothbore muzzle-loading cannon · 18th century

At Lundy's Lane: Drummond's guns on the hill, two 24-pounders, two 6-pounders and a 5.5-inch howitzer, tore up Scott's brigade in the open before the 21st took them.

The workhorse of 18th-century field artillery: light enough to move with infantry, heavy enough to break up an attack. At close range the gunners switched to canister, a tin can of musket balls that turned the gun into a giant shotgun.

Shot
6 lb iron round shot, or canister
Range
round shot to about 1,200 yd; canister about 300 yd
Crew
about 6–8 men
Photo: Photojunkie · Public domain
Congreve rocket

Congreve rocket

Rocket artillery · c. 1806-1867

At Lundy's Lane: A Royal Artillery rocket section fought beside the guns on the hill.

William Congreve developed his iron-cased rockets from the war rockets Britain had faced in Mysore, India. They were light and could be fired in salvos from simple frames or even the ground, but their flight was famously unpredictable. Britain used them at Copenhagen, Leipzig and Fort McHenry (the 'rockets' red glare') before newer designs replaced them.

Sizes
Light 6- to 18-pounders up to heavy 300-pounders
Range
Up to about 2,000-3,000 yards by size
Guidance
Long wooden stick; notoriously erratic
Photo: Rama · CC BY-SA 3.0 fr

U.S. Left Division (Brown: Scott, Ripley, Porter)

French Model 1766 musket ("Charleville")

French Model 1766 musket ("Charleville")

Smoothbore flintlock musket · 1766–1777 pattern

At Lundy's Lane: The pattern behind the American Springfield muskets carried by Brown's regulars.

France shipped tens of thousands of these muskets to the Continental Army from 1777, quietly, before it entered the war. Lighter and slightly smaller-bored than the Brown Bess, it became the pattern for America's first national musket, the Springfield Model 1795.

Caliber
.69
Effective range
about 100 yd
Rate of fire
2–3 rounds a minute
Photo: Charleville Arsenal · Public domain
Socket bayonet

Socket bayonet

Edged weapon (musket attachment) · c. 1690s-1860s

At Lundy's Lane: Miller's 21st Infantry fired one volley into the gunners at a few yards and took the guns with the bayonet.

The socket bayonet slipped over the outside of the musket barrel and locked in place, turning every musket into a short pike without blocking the muzzle. It made the pike obsolete and let infantry defend themselves against cavalry and finish an assault at close quarters. For a century and a half, a determined bayonet charge often decided fights that musketry could not.

Length
Triangular blade, about 17 in on the Brown Bess
Use
Fitted over the muzzle so the musket could still be fired
Photo: Rama · CC BY-SA 2.0 fr
Light 6-pounder field gun

Light 6-pounder field gun

Smoothbore muzzle-loading cannon · 18th century

At Lundy's Lane: Towson's, Biddle's and Ritchie's companies fought their guns beside the captured British pieces through the night.

The workhorse of 18th-century field artillery: light enough to move with infantry, heavy enough to break up an attack. At close range the gunners switched to canister, a tin can of musket balls that turned the gun into a giant shotgun.

Shot
6 lb iron round shot, or canister
Range
round shot to about 1,200 yd; canister about 300 yd
Crew
about 6–8 men
Photo: Photojunkie · Public domain

Paintings and photographs

Battle of Lundy's Lane (Chappel)
Battle of Lundy's Lane (Chappel) Alonzo Chappel's engraving of the night fight on the hill. Alonzo Chappel — public domain · source
Battle of Lundy's Lane (painting)
Battle of Lundy's Lane (painting) A period-style painting of the battle (New York State Military Museum). Public domain · source
The battleground, 1850s
The battleground, 1850s Thomas Easterly's daguerreotype of the Lundy's Lane battleground, one of the earliest photographs of a War of 1812 field. Thomas Martin Easterly — public domain · source
Lundy's Lane monument
Lundy's Lane monument The battle monument in Drummond Hill Cemetery, where the British guns stood. Tyler Campbell, CC BY-SA 4.0 · source

Free for everyone every year on its anniversary: July 25.

Accuracy score: 63/100 (moderate)

How the accuracy score works

Sources and method

Lundy's Lane, 25 July 1814. The British position is placed from the Battle of Lundy's Lane marker series of the City of Niagara Falls and the Historic Sites and Monuments Board plaque, with positions from the Historical Marker Database: The British Defense (Drummond's hilltop and the five guns), The Americans Attack, Facing the American Attack, The Americans Capture the British Guns (the 21st on the south-east slope), American Withdrawal, The Aftermath of Battle and the national plaque in Drummond Hill Cemetery. Site descriptions: Parks Canada, Battle of Lundy's Lane National Historic Site of Canada, and the Canadian Register of Historic Places; Niagara Falls Museums (Lundy's Lane Historical Museum), Lundy's Lane battlefield tour and history notes. The course of the battle follows the American Battlefield Trust, Lundy's Lane; Wes Turner, Battle of Lundy's Lane (The Canadian Encyclopedia); Brock University Library, Advance to Lundy's Lane; and, for the order of battle, strengths, Jesup's route, Hercules Scott's column and the official casualty returns, Donald E. Graves, Where Right and Glory Lead! The Battle of Lundy's Lane, 1814 (1997), with Richard V. Barbuto, Niagara 1814 (2000). The U.S. Army's staff ride handbook, Barbuto, Staff Ride Handbook for the Niagara Campaigns, 1812-1814 (Combat Studies Institute Press, 2014), covers the battle, but its text could not be read, and the positions and timings here were NOT checked against it. Scott's line order follows the Western Pennsylvania History article and Warfare History Network; the size of Hercules Scott's column follows History of War and mywarof1812.com; Hamilton's 2nd Militia Brigade and the Royal Scots reserve are placed schematically. Night details: Glengarry Light Infantry history (Jesse Pudwell) and World History Encyclopedia (after Pierre Berton). Scott's deployment line, Jesup's exact route, the western flank, the British night line and the approach of Hercules Scott's column are interpretive; accounts differ on timings, which American regiments flanked the 21st, and the number of British counterattacks. Images from Wikimedia Commons.

Where the positions come from

Further reading