Battlefield Atlas
Wars of the Roses · 1485 Free to explore

Bosworth, 22 August 1485

On 22 August 1485, Henry Tudor's small army of exiles, Welshmen and French mercenaries met the larger royal army of Richard III on Redemore, the low ground south-west of Market Bosworth. The Earl of Oxford's vanguard went round a marsh and broke the Duke of Norfolk's vanguard, and Norfolk was killed. The Earl of Northumberland never engaged. Richard charged at Henry himself, and was cut off and killed in the marsh when Sir William Stanley's men joined the fight against him. Richard was the last English king to die in battle. His death ended the Plantagenet line, and Henry VII, crowned on the field, founded the Tudor dynasty. For centuries the battle was placed on Ambion Hill, where the Heritage Centre stands. The Battlefields Trust survey of 2005–2010, led by Glenn Foard, moved it about 3 km south-west, to either side of Fenn Lane by the old Fen Hole marsh near Dadlington and Stoke Golding, where it found medieval round shot and a silver-gilt boar badge. Historic England revised the registered battlefield to match. Unit positions on this map follow that reconstruction and are interpretive.

Open the interactive map8 stages on modern satellite imagery and terrain, with 3D elevation

This battle is free to explore — no account needed.

The Battle of Bosworth (de Loutherbourg)
The Battle of Bosworth (de Loutherbourg) — Philip James de Loutherbourg · public domain

The battle, stage by stage

  1. 22 August 1485, early morning

    Converging on Redemore

    Henry Tudor, who had landed in Wales on 7 August, has camped near Merevale and Atherstone; King Richard III has marched from Leicester and camped on the high ground around Sutton Cheney and Ambion Hill. On the morning of 22 August Henry's small army — about 5,000 by Historic England's estimate (modern figures range to 8,000), with perhaps 1,800–2,000 French mercenaries — comes east along the old Roman road now called Fenn Lane. The royal army, put at anything from 7,500 to 15,000, comes down onto the low ground the sources call Redemore. Thomas, Lord Stanley and his brother Sir William, with perhaps 3,000–6,000 men, hold off to the south toward Dadlington and Stoke Golding, committed to neither side.

  2. Morning

    Either side of the marsh

    Polydore Vergil, Henry's later official historian, says a marsh lay between the armies, 'which Henry purposely kept on his right'. Foard's survey found peat in the old meadow land here and puts that marsh at Fen Hole, beside Fenn Lane, about 3 km south-west of the traditional site on Ambion Hill. Norfolk and his son Surrey lead the royal vanguard of archers and billmen, with the guns; Richard is behind with his household; Northumberland has the rearguard, probably on the left. On the other side, Oxford commands the vanguard, which in practice is almost all of Henry's army, with Talbot on the right and Savage on the left; Henry waits behind with a few horsemen. The royal guns open fire.

  3. Morning

    Oxford's attack on Norfolk

    Under fire, Oxford leads the rebel vanguard north around the marsh, keeping it on his right, and strikes the royal vanguard on its flank. Accounts suggest the sun was then behind him. Most of the lead round shot the survey found, about 34 balls of several calibres scattered over more than a kilometre around Fenn Lane, is thought to come from this phase. It is the largest group of late-medieval round shot recovered from any European battlefield, though the guns probably mattered less than the archers and bills.

  4. Mid-morning

    Norfolk killed; Northumberland stands

    Oxford orders his men to keep within ten feet of their standards and re-forms them into a dense body (some accounts call it a wedge). They press on, and the royal vanguard begins to give way. Norfolk is killed. One later ballad says Sir John Savage killed him, and tradition puts his death at the foot of a windmill, possibly near today's Apple Orchard Farm. Northumberland, on the royal left, does not move. Historians still argue over whether that was treachery or because the marsh and the Stanleys stood in his way.

  5. Late morning

    Richard's charge at Henry

    Told that Henry is some way behind his own lines with only a small guard, perhaps on his way to the Stanleys, Richard leads his household knights in a mounted charge to end the battle by killing him. Vergil writes that Richard killed Henry's standard-bearer, Sir William Brandon, with his own hand, and unhorsed the giant Sir John Cheyne. Henry's bodyguard, with foot soldiers (French pikemen in some modern readings), holds. The line of the charge drawn here is conjectural: the survey put it along the north edge of the marsh, toward the spot where the boar badge was later found.

  6. Late morning

    Sir William Stanley's intervention

    At this point Sir William Stanley commits his men, by most accounts about 3,000, on Henry's side. They come up from the south and surround Richard's small group, pushing it back toward the marsh. The Crowland chronicler and Vergil say Richard was offered a horse to escape and refused it. Lord Stanley's own part in the fighting is unclear. Most accounts have him holding back to the south.

  7. About noon

    Richard killed

    Richard's horse is reportedly stuck in the mire. He fights on foot and is killed: 'fighting manfully in the thickest press of his enemies,' says Vergil. Molinet says a Welshman struck the fatal blow with a halberd. His skeleton, found in Leicester in 2012, has eleven wounds, nine of them to the head. A silver-gilt boar badge, Richard's own emblem and the kind worn by his close retinue, was found in 2009 at the edge of the former marsh. It may mark this last fight, although the find spot shown here is only approximate. The royal army breaks; Surrey is captured. The 1511 chantry at Dadlington, where battlefield dead were buried, suggests the flight and killing reached that far.

  8. 22 August 1485, afternoon

    Crown Hill

    The battle has lasted about two hours. Henry's army gathers on the rising ground by Stoke Golding, later called Crown Hill. A contemporary account says it was 'a mountayne hyghe' where the soldiers cried 'King Henry!'. Lord Stanley places Richard's circlet on Henry's head; the story that it was found in a hawthorn bush comes from later tradition. Richard's body is stripped and carried to Leicester for display. About 1,000 royalists and perhaps 100 of Henry's men are thought to have died. Henry VII dates his reign from 21 August, the day before the battle, so that those who fought for Richard can be attainted as traitors.

Weapons

Royal army of Richard III (Norfolk, Northumberland)

Early cannon (pot-de-fer and ribalds)

Early cannon (pot-de-fer and ribalds)

Gunpowder artillery · from the 1320s

At Bosworth: Richard's guns fired across the marsh; the survey found the largest collection of 15th-century round shot from any European battlefield.

The earliest European guns were small cast vessels firing bolts or balls. The Italian chronicler Giovanni Villani says the English fired guns at Crécy, frightening the horses; English royal accounts show guns were later sent to the siege of Calais, and historians still argue over whether any fired on 26 August 1346. The illustration, from Walter de Milemete's treatise of 1326, is one of the oldest pictures of a gun.

Projectile
iron or lead balls, or large bolts
Charge
black powder
Effect
more noise and shock than killing power
Photo: Walter de Milemete, 1326 · public domain
Poleaxe

Poleaxe

Staff weapon · about 1400–1550

At Bosworth: Richard's household men-at-arms charged with him; he reportedly fought on after being unhorsed.

The armoured man-at-arms' weapon for fighting on foot: an axe or hammer head with spikes on a long haft, built to crush and pierce plate. At Agincourt dismounted men-at-arms on both sides fought with poleaxes, swords and lances cut down to a manageable length.

Length
about 1.5–2 m
Head
axe or hammer, with a top spike and often a back spike
Use
two-handed, by armoured men on foot
Photo: Italian poleaxe, Metropolitan Museum of Art · CC0

Henry Tudor's army (Oxford commanding the van)

English longbow

English longbow

Self bow of yew · about 1250–1550

At Bosworth: Oxford's archers and men advanced in close order around the marsh against Norfolk.

A single stave of yew, as tall as a man, that took years of practice to draw. Massed in thousands behind stakes or hedges, English archers broke French charges at Crécy, Poitiers and Agincourt by killing and maddening the horses and pinning men-at-arms in the crush. Bows recovered from the Mary Rose (sunk 1545) show how heavy the draw weights were. In the Wars of the Roses both sides fielded massed longbowmen, as at Towton in 1461.

Draw weight
commonly about 100–150 lb (Mary Rose bows)
Range
about 250–300 yd for volleys with light arrows
Rate
up to 10–12 arrows a minute for a trained archer
Photo: Archer's kit and longbow from the Mary Rose · Tim Sheerman-Chase · CC BY 4.0
English bill

English bill

Polearm · 14th–16th century

At Bosworth: Sir William Stanley's men surrounded Richard's small group.

A farm billhook on a long shaft, the standard weapon of English infantry in the Wars of the Roses alongside the longbow. Its hook could pull armoured men down and its spike and blade finish them.

Length
about 1.8–2.4 m
Head
hooked blade with spike
Users
English foot soldiers
Photo: Monstrelet · CC BY-SA 3.0

Paintings and photographs

The Battle of Bosworth (de Loutherbourg)
The Battle of Bosworth (de Loutherbourg) Philip James de Loutherbourg's 1804 painting of the battle. Philip James de Loutherbourg · public domain · source
Fenn Lane Farm fields
Fenn Lane Farm fields Looking west across the fields of Fenn Lane Farm, near where the survey placed the fighting. Daveleicuk · CC BY-SA 4.0 · source
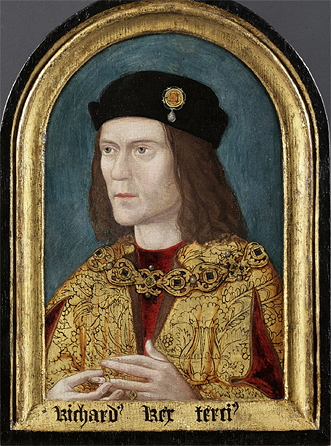
Richard III
Richard III The earliest surviving portrait of Richard III, the last English king to die in battle. Society of Antiquaries · public domain · source
The crown brought to Henry
The crown brought to Henry Lord Stanley brings Richard’s crown to Henry Tudor (19th-century illustration). Public domain · source

Free for everyone every year on its anniversary: August 22.

Accuracy score: 58/100 (limited)

How the accuracy score works

Sources and method

Bosworth, 22 August 1485. Placement follows the Bosworth Battlefield Survey (Battlefields Trust / Leicestershire County Council, 2005–2010): G. Foard & A. Curry, Bosworth 1485: A Battlefield Rediscovered (Oxbow, 2013), and the project archive at the Archaeology Data Service (Bosworth Battlefield Project archive, incl. primary-source transcripts).
  • Historic England, Register of Historic Battlefields: Battle of Bosworth (Field) 1485 (revised entry: armies, marsh, Oxford's flank move, Norfolk's death near the windmill, Northumberland, Stanleys, round shot, Dadlington chantry, Crown Hill).
  • Battlefields Trust, Bosworth Battlefield Survey and battlefield drive.
  • Bosworth Battlefield Heritage Centre, The battle.
  • Leicestershire County Council, Bosworth Battlefield Conservation Plan.
  • Dissent: J. Shaw & P. Shaw, 'Bosworth Field: a battlefield rediscovered?', British Journal for Military History 9.1 (2023), which argues for a site near Wellsborough and reads the shot scatter and badge differently.
  • Contemporary and near-contemporary sources: the Crowland Chronicle continuation (1486); Diego de Valera's letter (1486); Jean Molinet; Polydore Vergil, Anglica Historia (c. 1512–13), the main narrative and written for Henry VII; later ballads (Bosworth Feilde, Lady Bessy), which may preserve Stanley family tradition. The hawthorn-bush crown, King Richard's Well and the Ambion Hill site are later tradition.
  • Fixed points: Historic England listings (Apple Orchard Farm 1074242; St James, Sutton Cheney 1074245), British Listed Buildings (St James, Dadlington), gazetteer.org.uk, Stoke Golding village history (coronation). Fenn Lane Farm, the marsh, the badge find spot, the shot scatter and Crown Hill are placed approximately, because the survey did not publish exact find spots.
Strengths are given as attributed ranges: Richard 7,500–15,000; Henry about 5,000–8,000; the Stanleys about 3,000–6,000. Images from Wikimedia Commons.

Where the positions come from

Further reading