Battlefield Atlas
Seven Years' War · 1755 Members · from $3

Battle of the Monongahela, 9 July 1755

On 9 July 1755, Major General Edward Braddock's flying column, about 1,300 British regulars and colonial troops, crossed the Monongahela for the second time about 8 miles from Fort Duquesne. A few minutes' march beyond the ford it met a force of about 900 sent out from the fort under Captain Daniel Liénard de Beaujeu: French marines, Canadian militia and some 600 warriors from many nations. Beaujeu was killed early on. Captain Jean-Daniel Dumas rallied the French, and the warriors spread along both flanks of the column and onto a hill on its right. For two to three hours they fired into a column that had jammed in the road. Braddock was mortally wounded and his army broke. About two-thirds of the men who crossed the river were killed or wounded, against perhaps 30-40 French and Native dead. The boroughs of Braddock and North Braddock and the Edgar Thomson Works now cover the field. Positions are fitted from the 1755 Mackellar and Orme plans and modern reconstructions, and are approximate.

Open the interactive map7 stages on modern satellite imagery and terrain, with 3D elevation

This battle opens with Battlefield Enjoyer ($3 a month on Patreon), which unlocks every battle in the atlas and every one added later. Free battles include Thermopylae, Siege of Alesia, Hattin, Agincourt, Vítkov Hill, Bosworth, Fort William Henry, Yorktown, Waterloo, The Alamo, Antietam, Little Bighorn, Belleau Wood, Omaha Beach, Inchon, Ia Drang, 73 Easting, Wanat, Najaf.

Mackellar's plan, about 2 PM
Mackellar's plan, about 2 PM — Patrick Mackellar, 1755 — public domain

The battle, stage by stage

  1. 9 July 1755, about 1 PM

    The second crossing

    General Edward Braddock's flying column, about 1,300 British regulars and colonial troops, had camped on 8 July east of the Monongahela. That morning it crossed the river near the mouth of Crooked Run and marched down the west bank. Around midday it forded back to the east bank at Frazier's, just below the mouth of Turtle Creek, some 7-8 miles from Fort Duquesne. The river was some 300 yards wide and shallow. The steep banks had to be cut down for the guns and wagons. Lt Col Thomas Gage's advance party and Sir John St. Clair's working party crossed first. The main body followed in parade order with colors flying and drums beating, an image many survivors remembered. George Washington, still weak with fever, rode with the general as a volunteer aide. That morning, about 8 AM, Captain Daniel Liénard de Beaujeu had left Fort Duquesne to ambush the British at the crossing. With him went about 108 troupes de la marine, 146 Canadian militia and roughly 637 warriors (Contrecoeur's report). He was already too late. The crossing point and the route north are reconstructions.

  2. About 1:30 PM

    Collision on the road

    Gage's party had gone perhaps a mile beyond the river, climbing along the base of the hills and then north-west, roughly where Bell Avenue now runs. Its guides suddenly came back with word of the enemy. Beaujeu's column came into sight down the road ahead, near a gully that modern Sixth Street follows. Beaujeu waved his hat and his men spread out. Neither side had expected to meet here, and the French had no time to set an ambush. Gage's grenadiers deployed across the road and fired volleys, and his two 6-pounders opened with grapeshot. Braddock's Battlefield History Center on Sixth Street stands about where the fight began. Its exact place rests on the 1755 sketches and on Crocker's and Preston's reconstructions; the ground has been built over.

  3. About 1:45 PM

    Beaujeu falls; the warriors spread

    By Contrecoeur's report Beaujeu was killed by the third volley. Many of the Canadians broke and ran; Dumas wrote that about 100 fled. Captain Jean-Daniel Dumas took command and held the marines on the road. The warriors did not stop. They came from many nations: Ottawa, Ojibwe and Potawatomi from the Great Lakes, with Charles Langlade among their leaders, and Wyandot, Shawnee, Lenape, Mingo and mission Abenaki and others. They ran down both sides of the column through the woods. On the British right they took a hill that overlooked the road, the 'rising ground' that Mackellar's plan says the army should have held. The flank guards were driven in. Who stood where along each flank is not known, so the warrior positions are schematic.

  4. About 2 PM

    The column jams

    Gage's men, firing at an enemy they could barely see, fell back and lost their two 6-pounders. Braddock had sent the main body forward at the sound of the firing. The retreating advance party ran into it and into the working party, and the column jammed in the road. Mackellar's second plan shows the troops at this moment: 'the whole body joined, with little or no order', facing outward toward the fire. The 12-pounders sit in the road. The rear guard is split around the convoy, which has closed up behind it. The hill on the right is in the warriors' hands. The center of this crowd lay, roughly, under today's Washington Statue Park on Jones Avenue, which the state marker treats as the likely center of the battlefield.

  5. About 2:30-4 PM

    Fire into the crowded road

    For two to three hours the warriors and marines fired from behind trees and the slopes of two ravines into a packed mass, in places reportedly up to twenty men deep. Officers on horseback drew fire, and most were shot. Braddock had four or five horses killed under him. He ordered Burton to take the hill on the right, but the attack fell apart under fire. Virginians who took to the trees to fight the warriors' way were in some cases shot by regulars who took them for the enemy. Gage, St. Clair and Burton were all wounded. The British were slowly driven back across a hollow way (marked 'r' on Mackellar's plan), and the convoy behind them came under fire. The hill and hollow way are placed by inference, not survey.

  6. About 4:30-5:30 PM

    Braddock falls; the army breaks

    Braddock, who had at last ordered a retreat, was shot through the arm and into the lungs. Organized resistance ended. The men broke for the river, and drivers cut horses from the wagons; young Daniel Boone was one of the wagoners. Captain Robert Orme, Captain Robert Stewart and Washington got the general off the field. Burton and others tried and failed to rally men short of the ford, and Gage gathered some on the far bank. Only a few warriors, about 50 by one account, followed to the river and fired on the men crossing. Most stayed on the field to take plunder, scalps and captives. Washington had two horses shot under him; he later wrote of 'four bullets through my coat'. Braddock sent him back that night to Dunbar's division for wagons and food.

  7. 10-14 July 1755

    Braddock's death and burial

    The survivors fled back up their own road. At Dunbar's camp near Jumonville the rear division destroyed guns, powder and stores, and the army fell back past Great Meadows. Braddock died on the evening of 13 July at Old Orchard Camp, near Fort Necessity. Washington read the burial service the next morning. They buried him in the middle of the road and marched the army over the grave to hide it. Of the column, roughly 450-500 were killed and about 420-500 wounded (456 killed and 422 wounded in a common count; the NPS gives 914 of 1,373 rank and file and 63 of 86 officers). French and Native losses were about 30-40 killed (Contrecoeur's report and modern estimates differ). Beaujeu was buried at Fort Duquesne on 12 July. The fort stayed French until the Forbes expedition of 1758.

Then and now: how the ground has changed

The 1755 field has disappeared under the boroughs of Braddock and North Braddock and the Edgar Thomson Steel Works, and the shallow river the column waded is now a navigation pool behind Braddock Locks and Dam; only the general lie of the slopes and the street ravines recall the ground.

The interactive map can show the period landscape (1 shape: Battlefield now under Braddock, North Braddock and the Edgar Thomson Works (approximate)) under the units. Open the map.

Weapons

French and Native allies (Beaujeu, Dumas)

French Model 1766 musket ("Charleville")

French Model 1766 musket ("Charleville")

Smoothbore flintlock musket · 1766–1777 pattern

At Monongahela: French marines and Canadian militia carried French muskets.

France shipped tens of thousands of these muskets to the Continental Army from 1777, quietly, before it entered the war. Lighter and slightly smaller-bored than the Brown Bess, it became the pattern for America's first national musket, the Springfield Model 1795.

Caliber
.69
Effective range
about 100 yd
Rate of fire
2–3 rounds a minute
Photo: Charleville Arsenal · Public domain

British and colonial army (Braddock)

Short Land Pattern musket ("Brown Bess")

Short Land Pattern musket ("Brown Bess")

Smoothbore flintlock musket · 1768–1790s pattern

At Monongahela: The 44th and 48th fought in close order along the road.

The British infantryman's musket for most of the 18th century. Accuracy beyond about 100 yards was poor, so the tactics were volleys at close range followed by the bayonet, which the Brown Bess was built to carry.

Caliber
.75 (ball about .69)
Effective range
about 50–100 yd against a formed line
Rate of fire
3 rounds a minute, drilled
Photo: Tower (British Ordnance) · Public domain
Light 6-pounder field gun

Light 6-pounder field gun

Smoothbore muzzle-loading cannon · 18th century

At Monongahela: Gage's two 6-pounders were lost when the advance party fell back.

The workhorse of 18th-century field artillery: light enough to move with infantry, heavy enough to break up an attack. At close range the gunners switched to canister, a tin can of musket balls that turned the gun into a giant shotgun.

Shot
6 lb iron round shot, or canister
Range
round shot to about 1,200 yd; canister about 300 yd
Crew
about 6–8 men
Photo: Photojunkie · Public domain

Paintings and photographs

Mackellar's plan, about 2 PM
Mackellar's plan, about 2 PM Engineer Patrick Mackellar's plan of the column jammed on the road under fire from both flanks. Patrick Mackellar, 1755 — public domain · source
Mackellar's plan, the first contact
Mackellar's plan, the first contact Mackellar's plan of the opening of the action, when Gage's advance party met Beaujeu's force. Patrick Mackellar, 1755 — public domain · source
Braddock's death
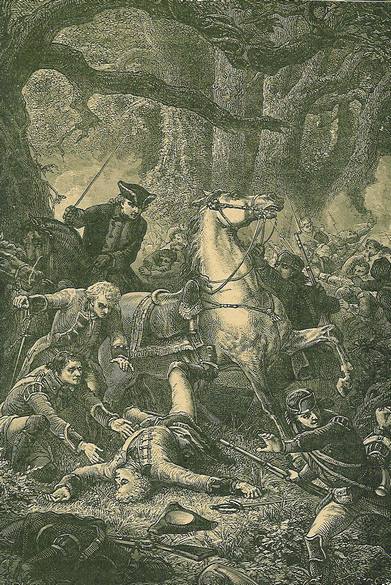
Braddock's death A 19th-century engraving of Braddock carried from the field, mortally wounded. Public domain · source
Braddock's Field (Weber)
Braddock's Field (Weber) Paul Weber's 19th-century painting of the ground at Braddock's Field. Paul Weber — public domain · source
Braddock's Battlefield History Center
Braddock's Battlefield History Center The museum on Sixth Street, near where the fighting began. Nbfinest1 — CC BY-SA 3.0 · source

Free for everyone every year on its anniversary: July 9.

Accuracy score: 56/100 (limited)

How the accuracy score works

Sources and method

Battle of the Monongahela (Braddock's Defeat), 9 July 1755.
  • Contemporary plans: Patrick Mackellar, '[Monongahela] no. 2: a sketch of the field of battle... about 2 o'clock' (1755; Library and Archives Canada, via Leventhal Map Center) and 'A sketch of the field of battle with the disposition of the troops in the beginning of the engagement' (Library of Congress G&M, ar303900); John Montresor's copy of an Indian sketch of the field (LOC ar302600); Robert Orme / Thomas Jefferys, 'A Plan of the Field of Battle and disposition of the Troops' (Royal Collection RCIN 731061.f; Frazier's House to Fort Duquesne '7 computed miles') and the plans of the advance party and line of march (RCIN 731061.c, line of march). The key of Mackellar's plan no. 2 (hill 's', hollow way 'r', abandoned guns, rear guard round the convoy) is followed for stage 4.
  • David L. Preston, Braddock's Defeat: The Battle of the Monongahela and the Road to Revolution (Oxford University Press, 2015), and his interview with George Washington's Mount Vernon ('Braddock's Defeat'): the Sixth Street ravine where Beaujeu's body was found, the 'rising ground' and the field under North Braddock and the Edgar Thomson Works.
  • National Park Service, Fort Necessity Historical Handbook 19, Braddock's defeat (crossing about 1 o'clock, hill on the right, two ravines, casualty returns, Braddock's death and burial); NPS Braddock's Grave.
  • Dictionary of Canadian Biography: Malcolm MacLeod, Liénard de Beaujeu (891 men: 637 Indians, 146 militia, 108 colonial regulars; killed at the third discharge, per Contrecoeur); Étienne Taillemite, Dumas.
  • Matthew A. Byron, 'Battle of the Monongahela' (Mount Vernon Digital Encyclopedia): 1,459 men, 977 killed or wounded, Washington's role in the retreat and the burial. Encyclopaedia Britannica, Battle of the Monongahela. American Battlefield Trust, Monongahela (about 500 killed and 500 wounded; French 30 killed, 57 wounded).
  • Paul E. Kopperman, Braddock at the Monongahela (University of Pittsburgh Press, 1977), the critical edition of the eyewitness accounts; Thomas E. Crocker, Braddock's March (Westholme, 2009), route through the modern boroughs (summarized in Wikipedia, Braddock's Field); Fred Anderson, Crucible of War (2000) for the 456 killed / 422 wounded count. Order of march and crossing times after Engineer Harry Gordon and Orme, as summarized by britishbattles.com.
  • Markers and sites: PHMC 'Braddock's Crossing' at Kennywood (text); 'Braddock's Defeat' and 'Braddock's Field', Washington Statue Park (HMdb 59177); Braddock's Spring; Braddock's Last Encampment (White Oak; first crossing near Crooked Run); Stewart's Crossing; Braddock's Original Grave Site; Braddock's Battlefield History Center (about; ABT heritage site); NPS Point State Park (Fort Duquesne tracery).
  • Primary accounts used through the works above: Contrecoeur's report and Dumas's letters (Papiers Contrecoeur, 1952); Orme's journal; Harry Gordon's journal; Washington to John Augustine Washington, 18 July 1755.
The ground is built over and no battlefield archaeology has fixed the lines; the route, the hill and the hollow way are reconstructions. Images from Wikimedia Commons (public domain).

Where the positions come from

Further reading